See which AI crawlers read your WordPress site and which pages they fetch, including pages served from your cache. Install the free ThriveStack AI Crawler Tracker plugin and connect in about five minutes, or let ThriveStack set it up for you.
What this does
AI assistants such as ChatGPT, Claude and Perplexity send crawlers (GPTBot, ClaudeBot, PerplexityBot and 40+ more) to read your pages.
Those visits are invisible to tools like Google Analytics, because crawlers do not run JavaScript or accept cookies.
They do show up in your web server's access log.
The ThriveStack AI Crawler Tracker plugin reads that access log and sends the AI crawler visits to AI Crawl Attribution in ThriveStack Citedby.
Because it reads the server log rather than watching WordPress itself, it also counts visits that your cache plugin or your host's cache answered without running WordPress.
On most sites that is the majority of AI crawler visits.
From then on you can see, for your domain:
Which AI crawlers visit, and how often.
Which pages they read, and what your site answered (200, redirect, 404, 5xx).
Crawl problems that can cost you citations, with recommended fixes.
At a glance
Time
About 5 minutes to connect (about 1 minute with Connect automatically). The plugin sends new visits every five minutes.
Requirements
WordPress 5.6 or later and PHP 7.4 or later. Connecting automatically also needs your site on HTTPS.
You need
A ThriveStack Citedby account (you can create one during setup) and a WordPress administrator account on your site.
Changes to your site
One plugin. No theme or code changes. Pages load exactly as before.
What we keep
Only AI crawler visits on your domain. Visits from people never leave your site. Details
Cost
The plugin is free. ThriveStack's AI Crawl Logs add-on is free during your trial. Details
Before you start
Know which site you are tracking. ThriveStack tracks the domain saved on your brand (shown at the top of the Connect panel, for example acmelabs.com).
Install the plugin on the WordPress site that serves that domain, either acmelabs.com or www.acmelabs.com.
Have a WordPress administrator account. Installing plugins and opening the plugin's settings needs one.
Sign in or sign up. You need a ThriveStack Citedby account. If you are new, you create it as part of setup, and your free trial starts.
Behind Cloudflare? If Cloudflare proxies your domain, use the Cloudflare Worker source on the same Setup page instead.
Cloudflare answers some visits from its own cache before they reach your WordPress server, and the Worker sees every one of them.
Only one server-log source can be active for a domain at a time, so choose one.
Connect from ThriveStack
This is the standard way: you install the plugin and paste a connection code. It works on every WordPress site.
(To let ThriveStack install and set up the plugin for you, see Connect automatically.)
Open Setup and choose WordPress
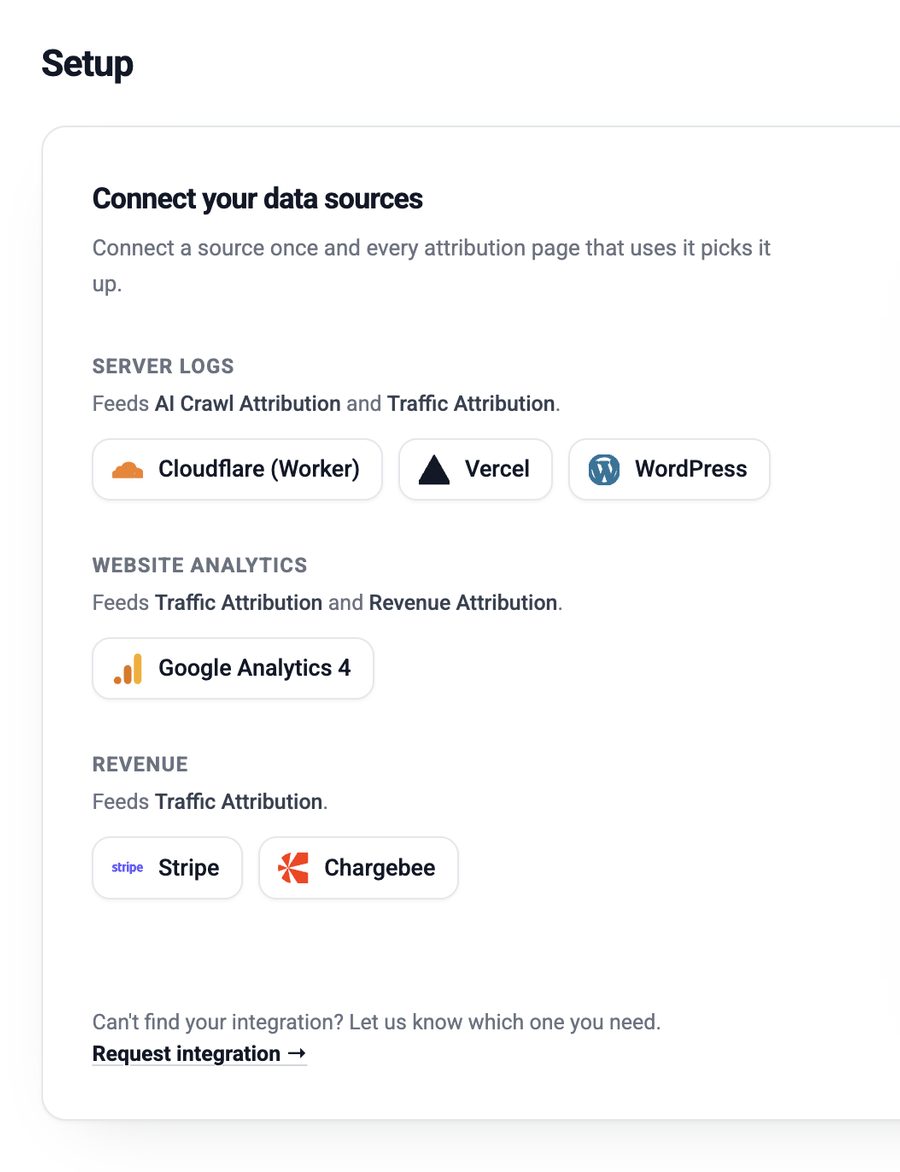
In ThriveStack Citedby, go to Attribution → Setup and click WordPress under Server logs.
Setup: pick WordPress under Server logs.
Follow the setup page
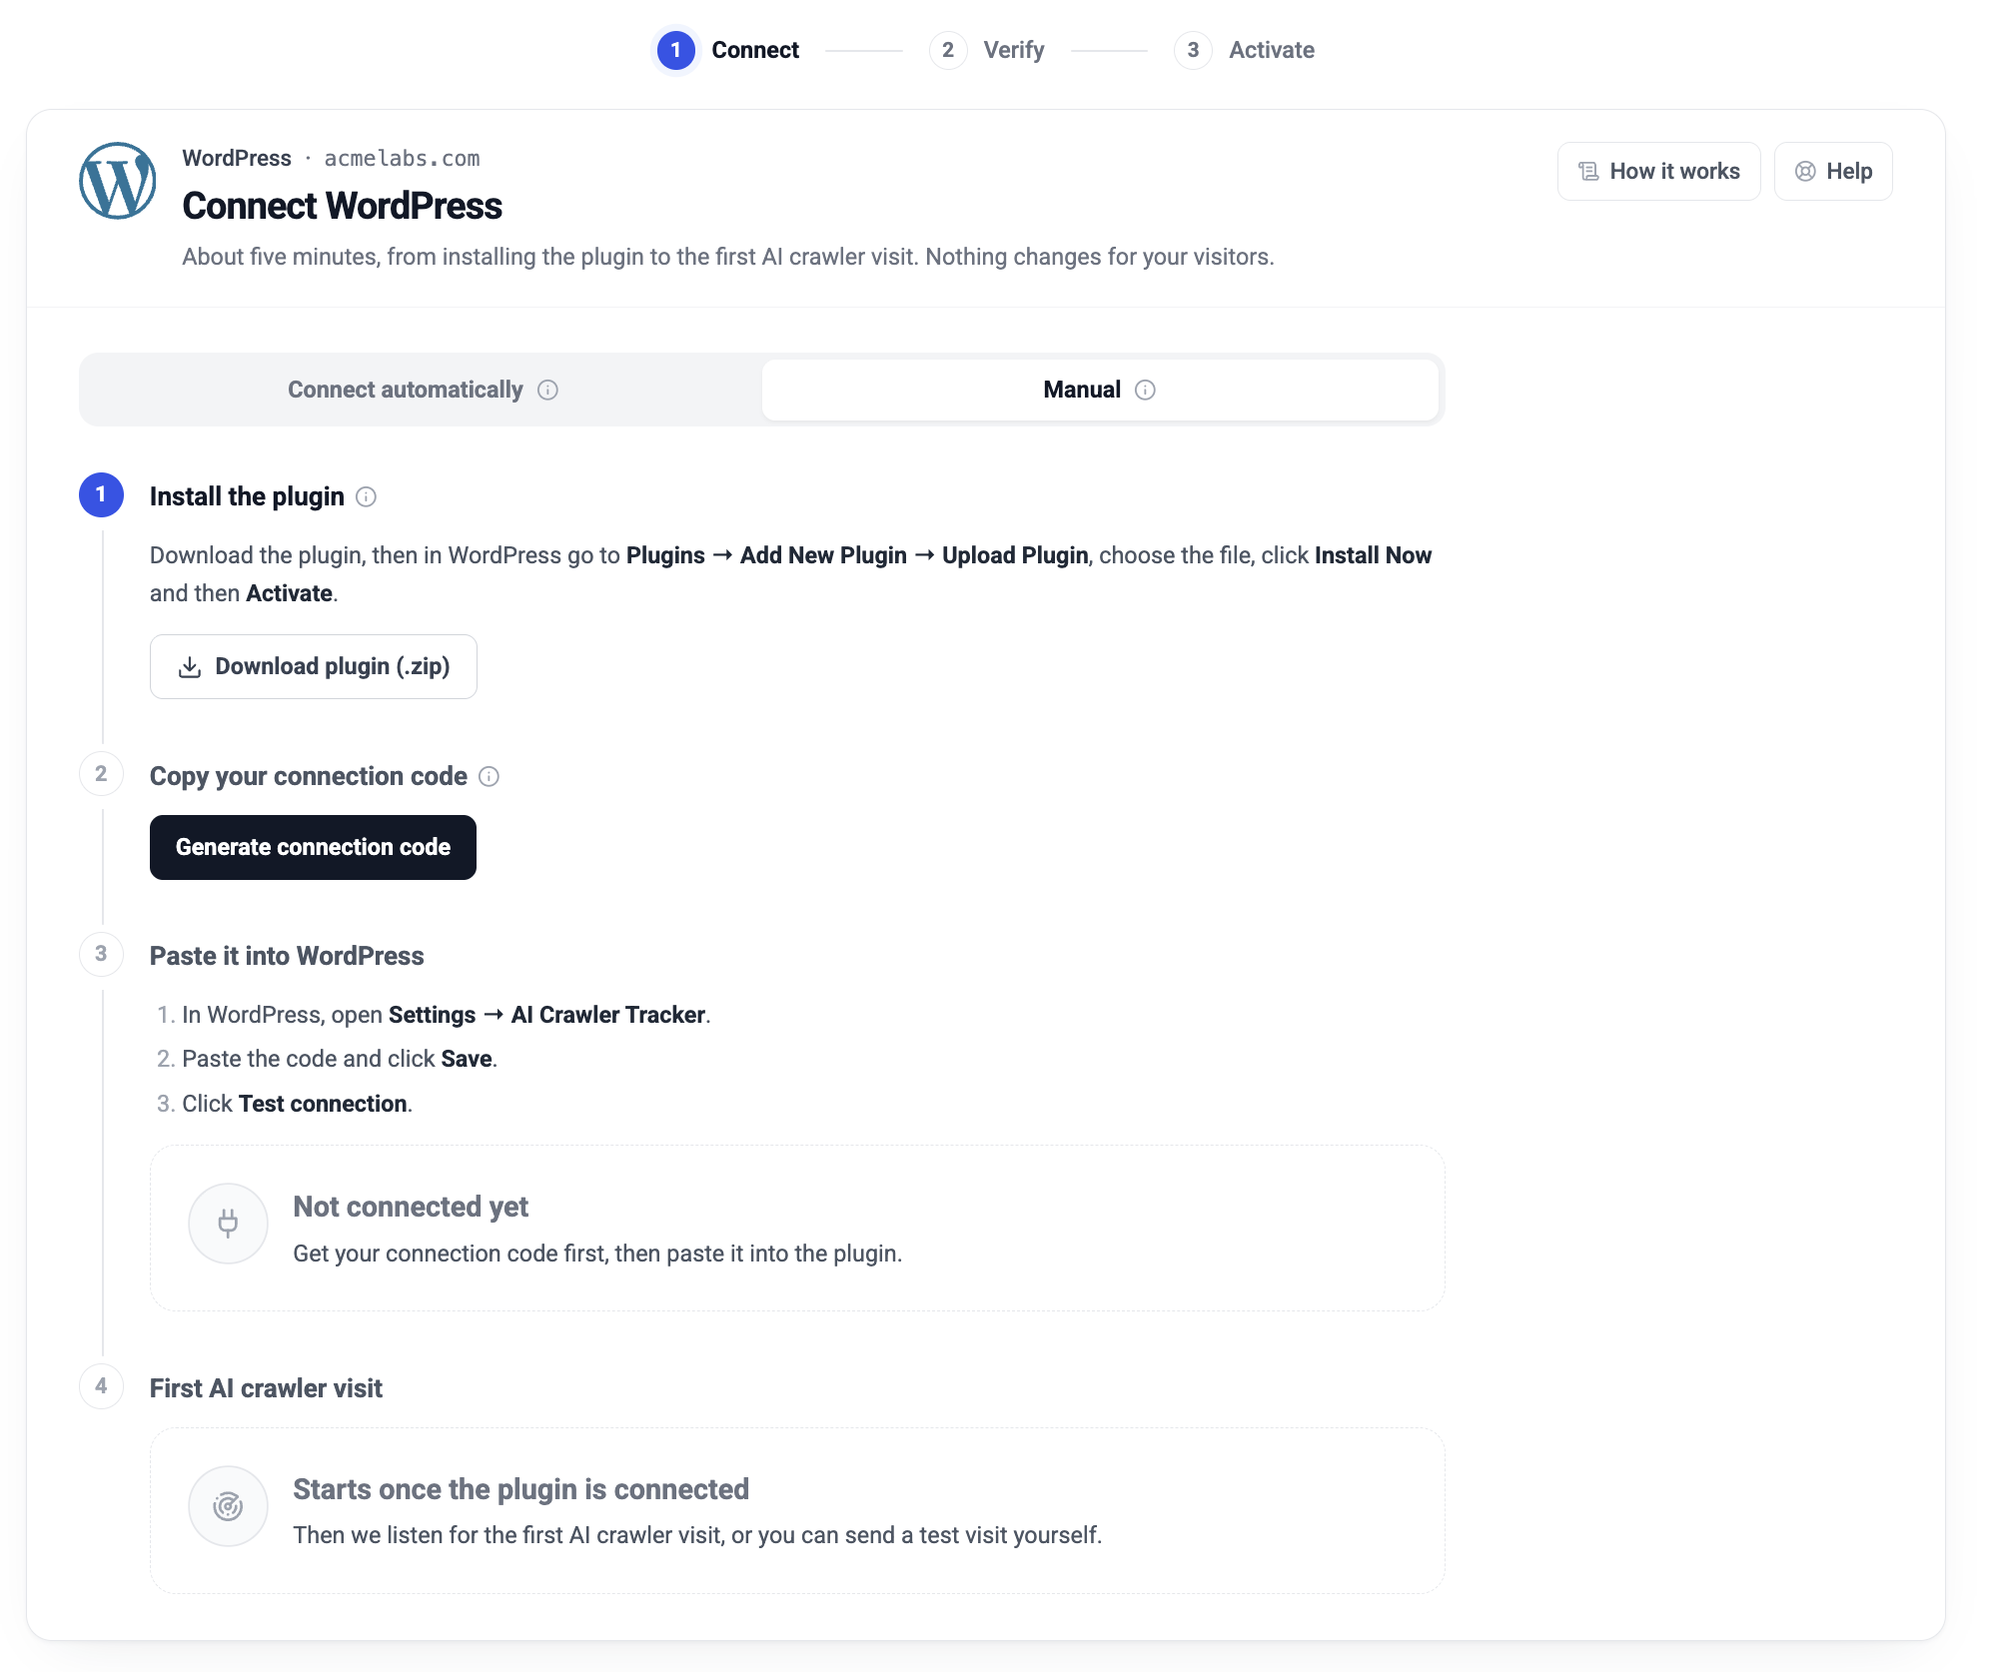
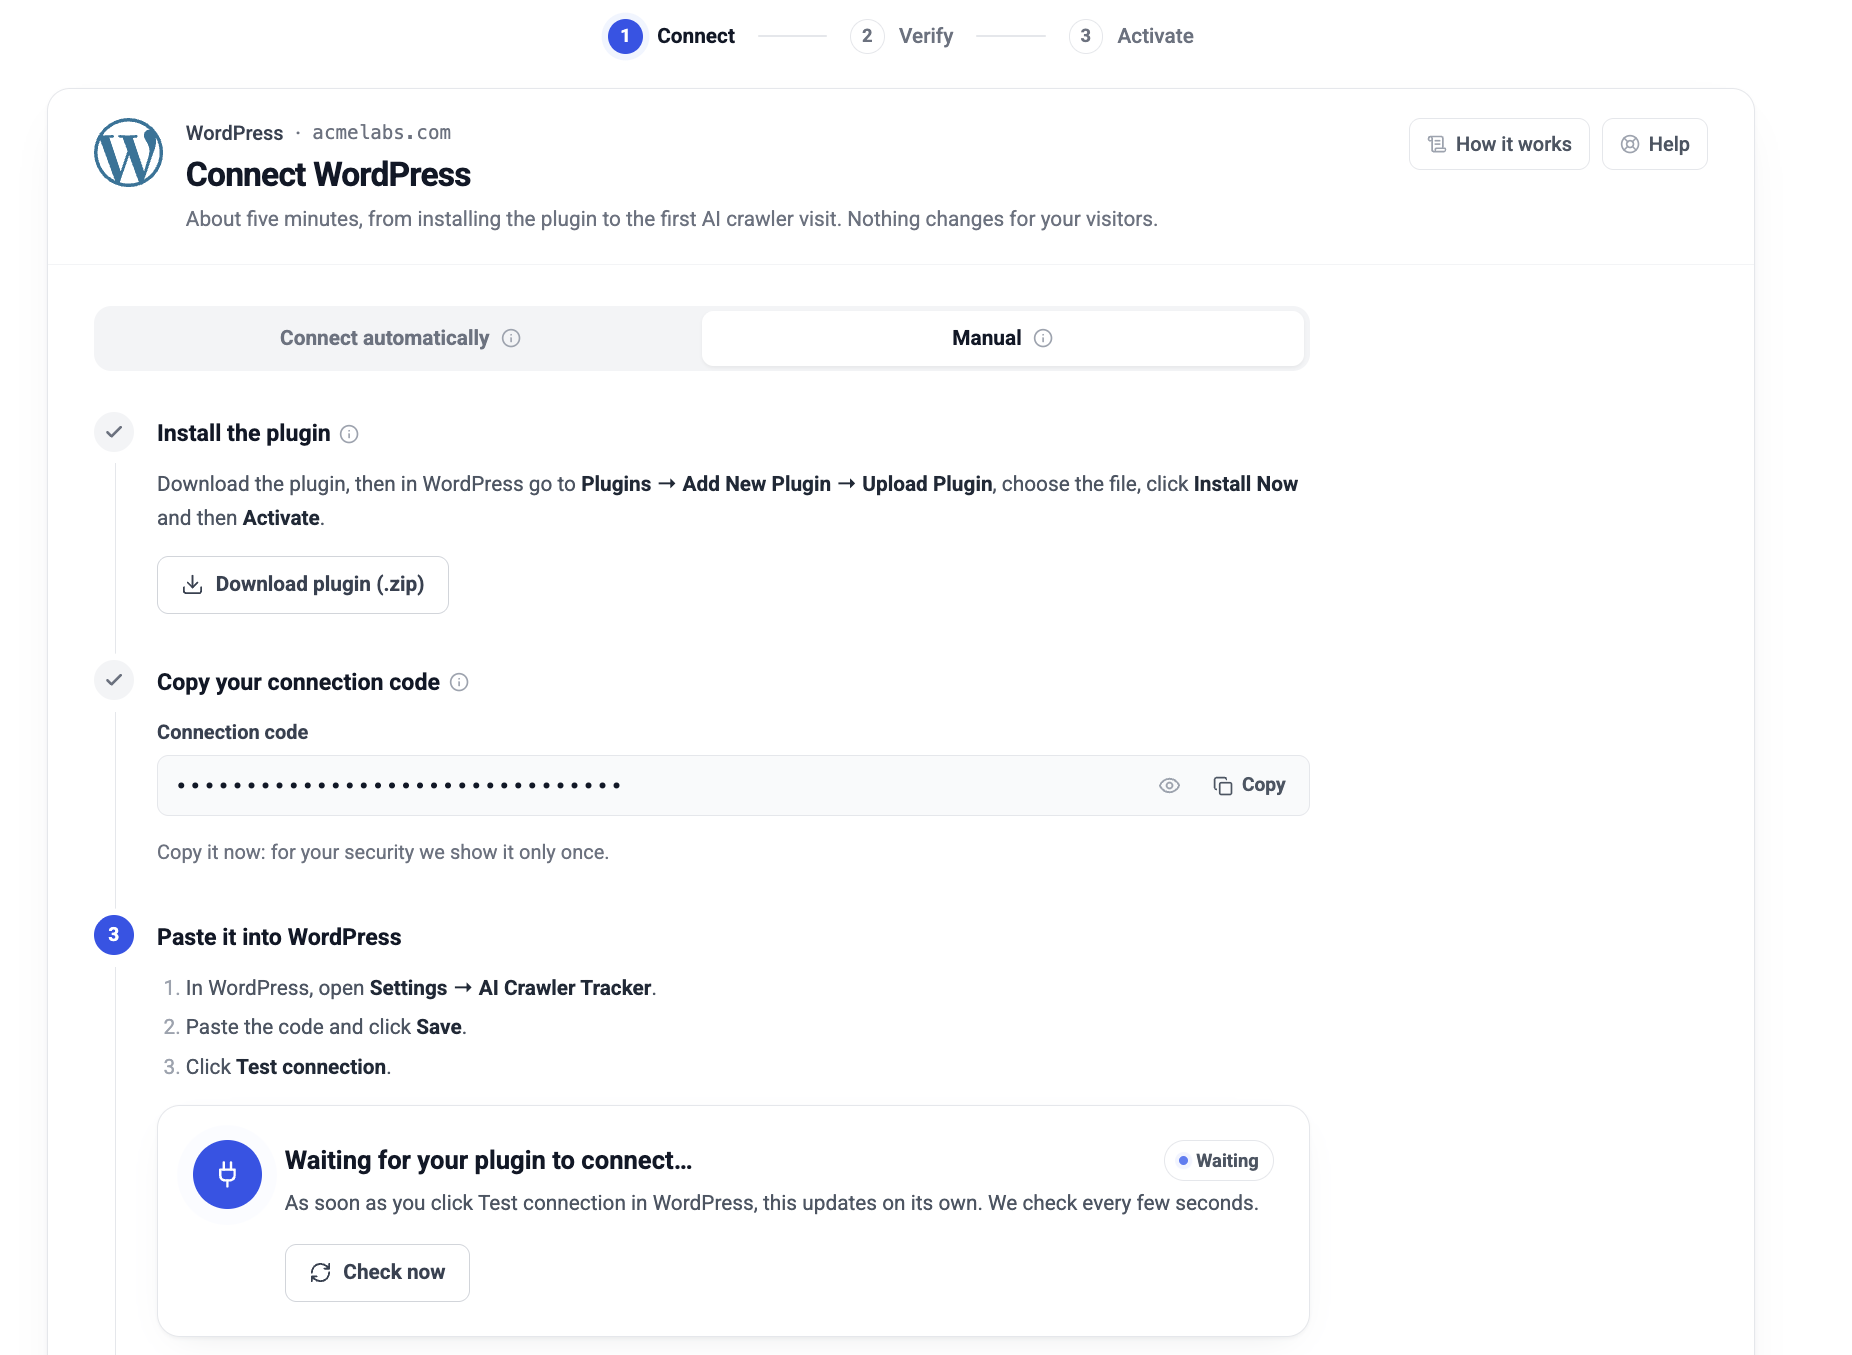
The Connect WordPress card holds the whole setup on one page, in four steps that you follow from top to bottom. The progress across the top (Connect, Verify, Activate) moves on as each part is done; no step is locked.
If you see the tabs Connect automatically and Manual, choose Manual for these steps.
How it works, next to Help at the top of the card, explains what the plugin does.
Connect WordPress: four steps on one page, with How it works and Help at the top.
Install the plugin
Click Download plugin (.zip). Keep the file as it is; there is no need to unzip it.
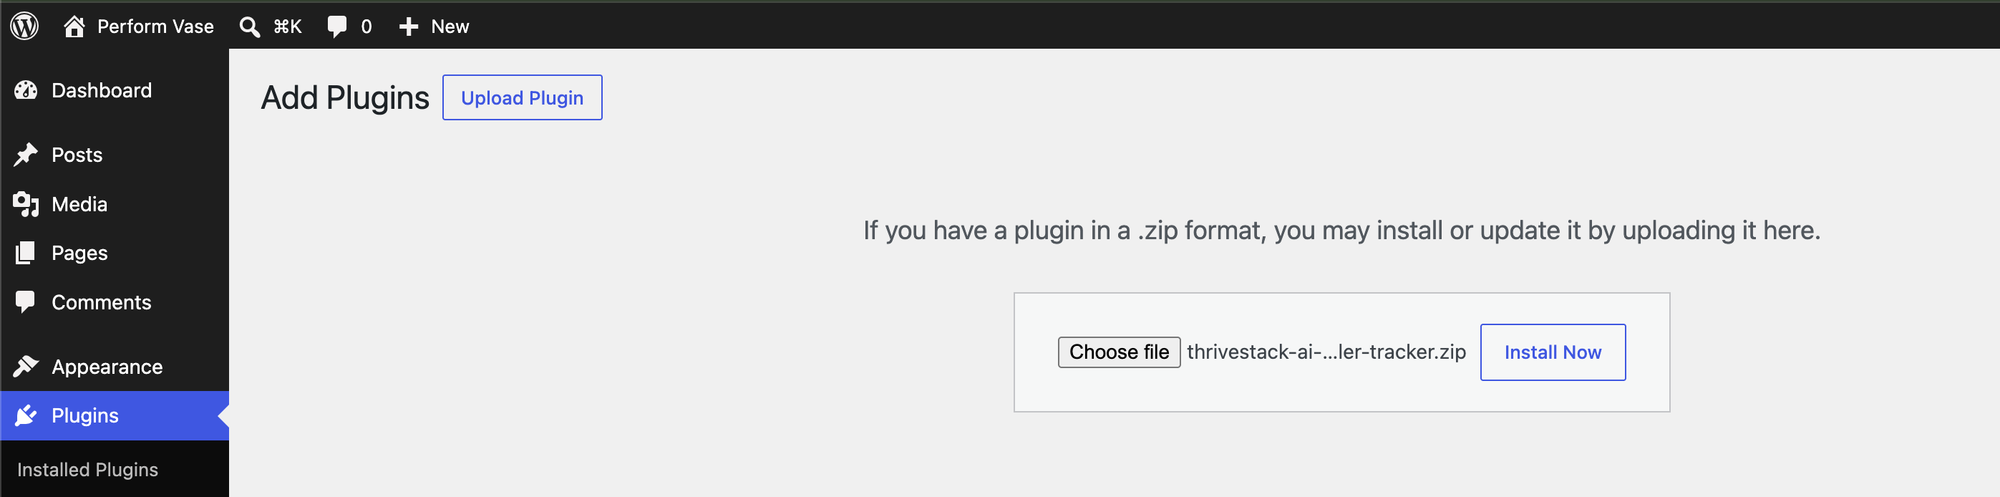
In your WordPress admin, go to Plugins → Add New Plugin → Upload Plugin, choose the file and click Install Now.
In WordPress: upload the zip and click Install Now.
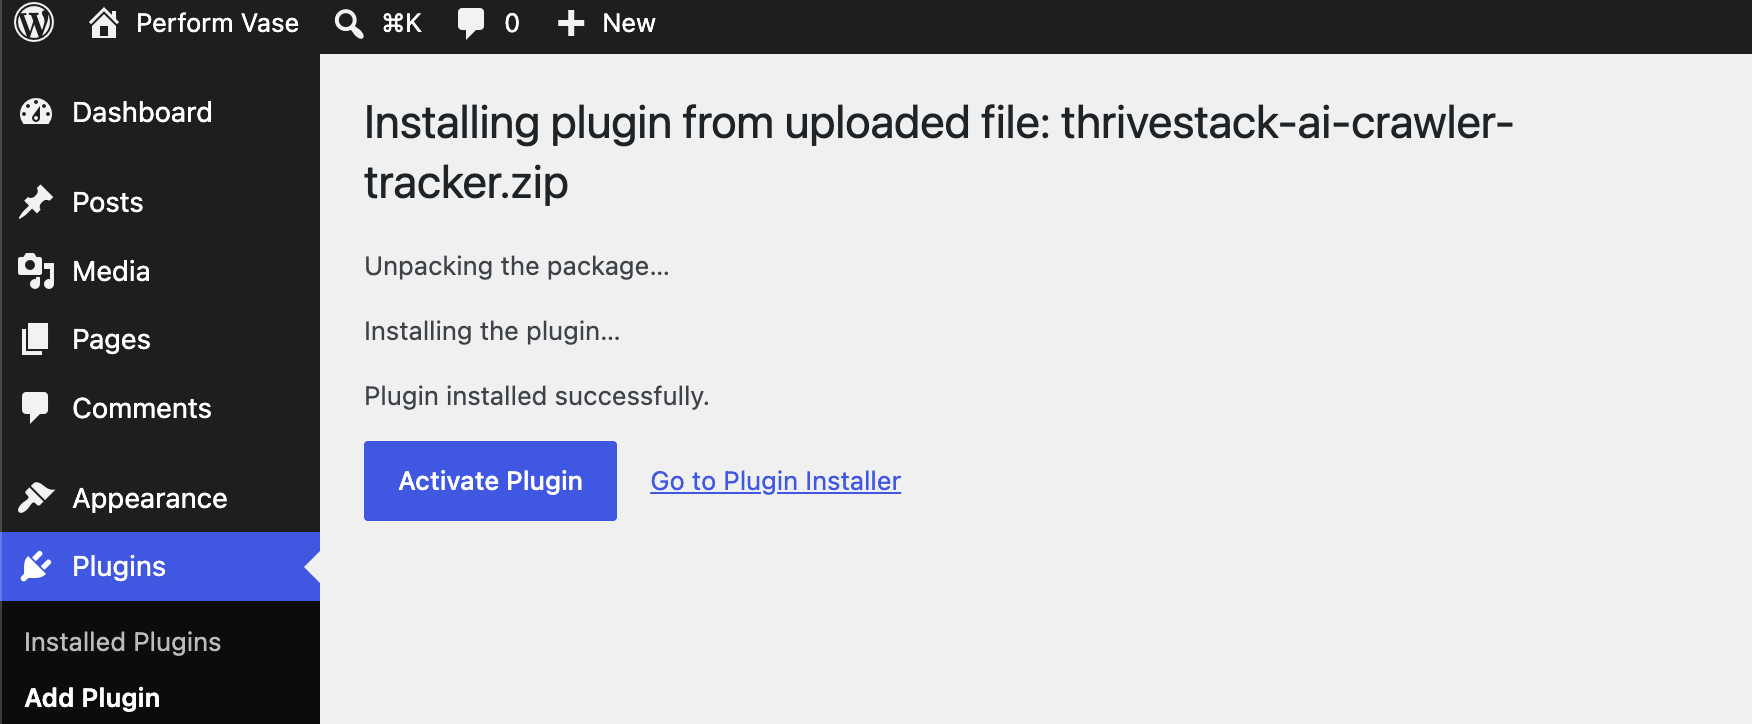
When WordPress says Plugin installed successfully, click Activate Plugin.
Then activate the plugin.
Copy your connection code
Back in ThriveStack, click Generate connection code and copy the code (it starts with tswp1.).
Copy it now. For your security the code is shown only once and stored encrypted. Lost it before pasting it? Come back to this step and click Get a new code. The old code stops working.
Paste it into WordPress
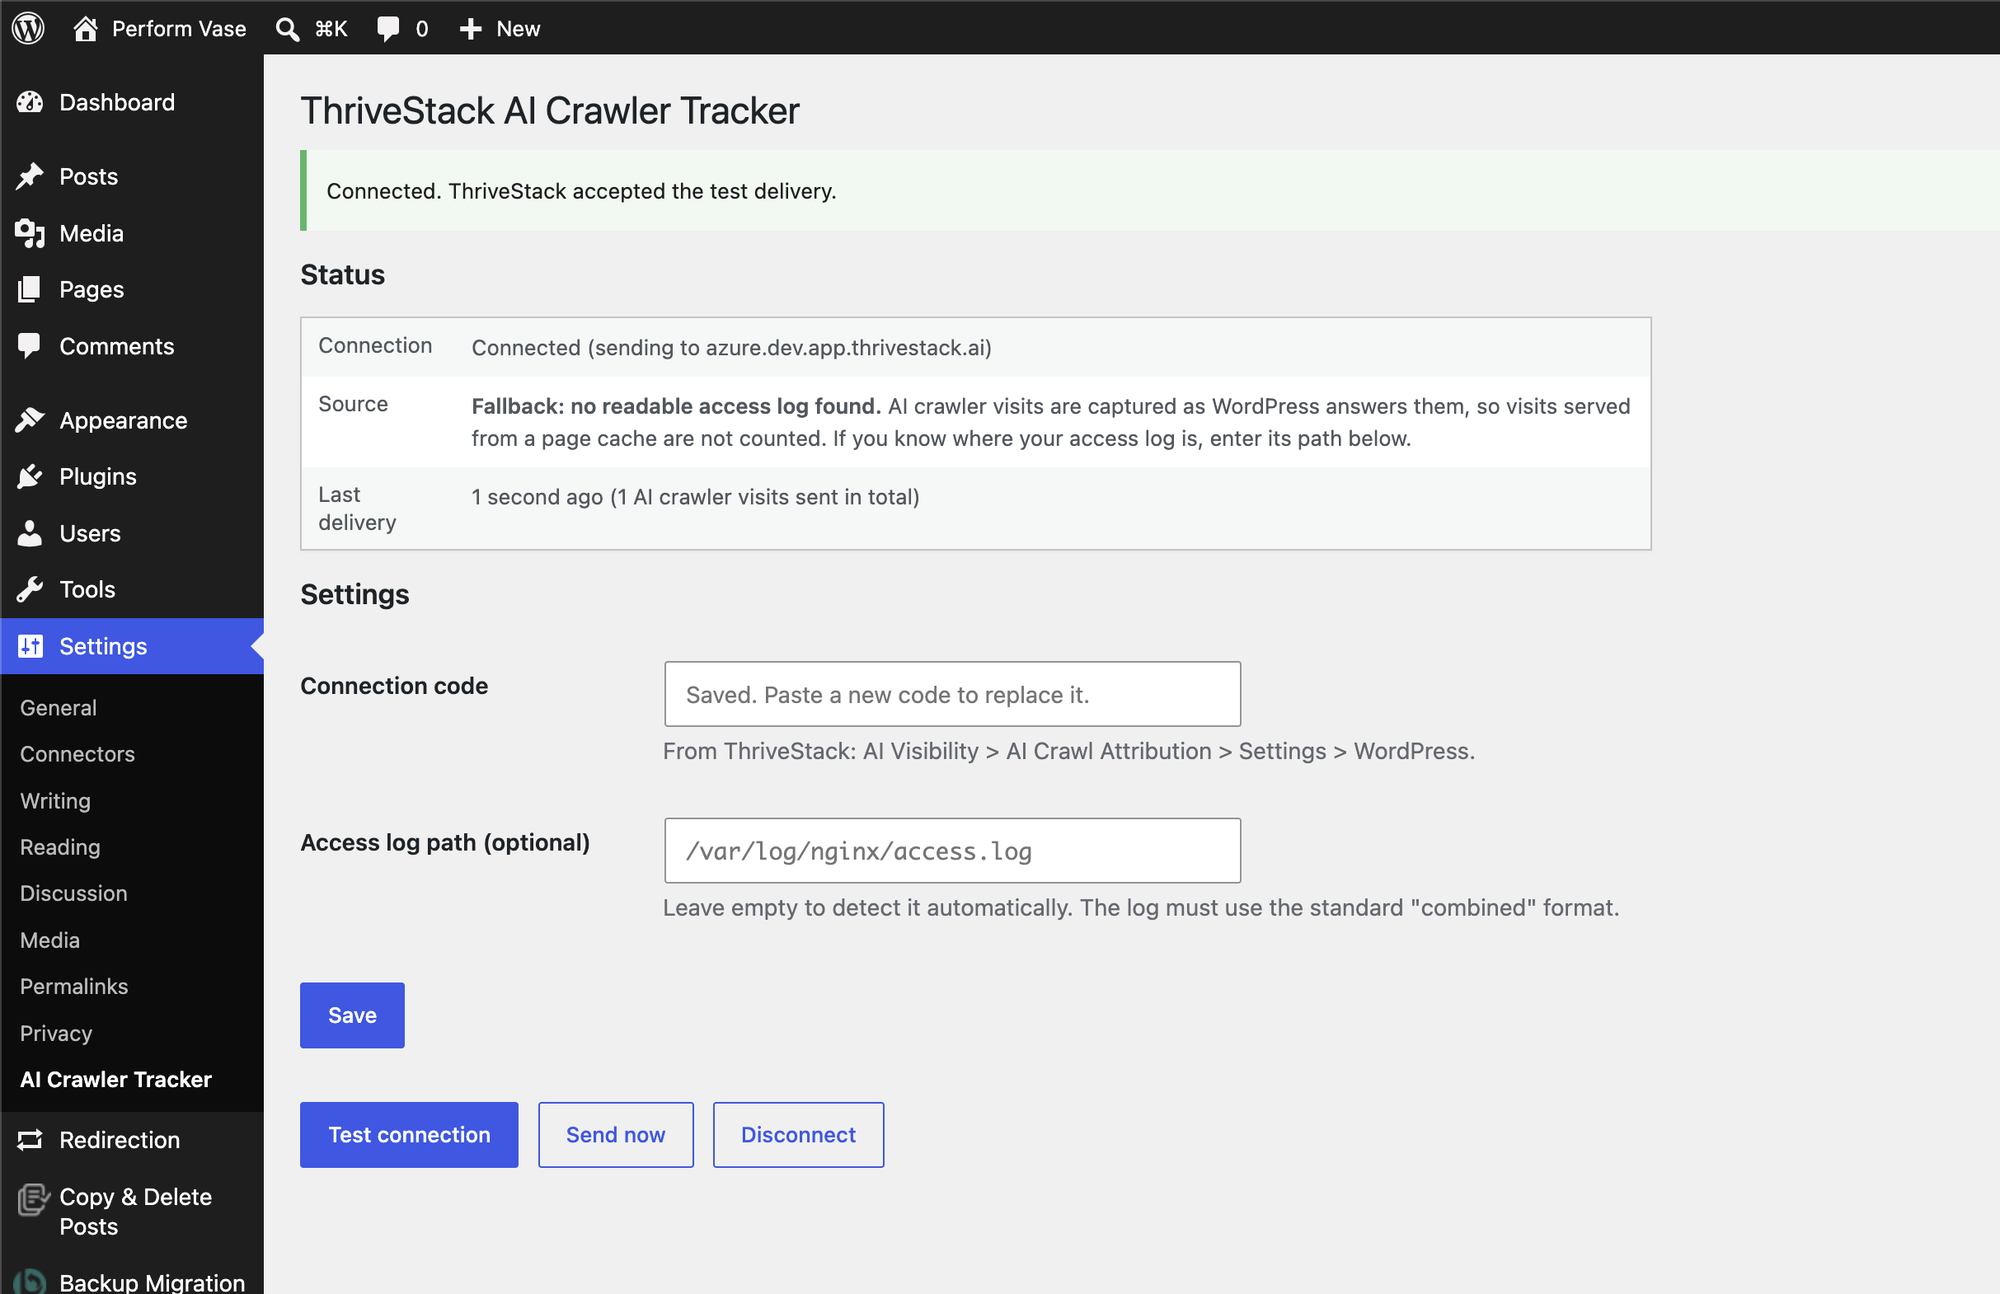
In WordPress, open Settings → AI Crawler Tracker, paste the code, click Save, then click Test connection.
You should see Connected. ThriveStack accepted the test delivery.
The plugin's Status box also shows its source: Server access log, or Fallback if your host does not let WordPress read the log (see How the plugin finds your visits).
The plugin's settings: the code is saved and the test delivery was accepted.
Meanwhile ThriveStack shows Waiting for your plugin to connect… and checks every few seconds. You don't need to click anything: as soon as the test delivery arrives, it changes to Plugin connected and the progress moves on to Verify.
Waiting for the plugin: this updates on its own when you click Test connection.
Wait for the first AI crawler visit
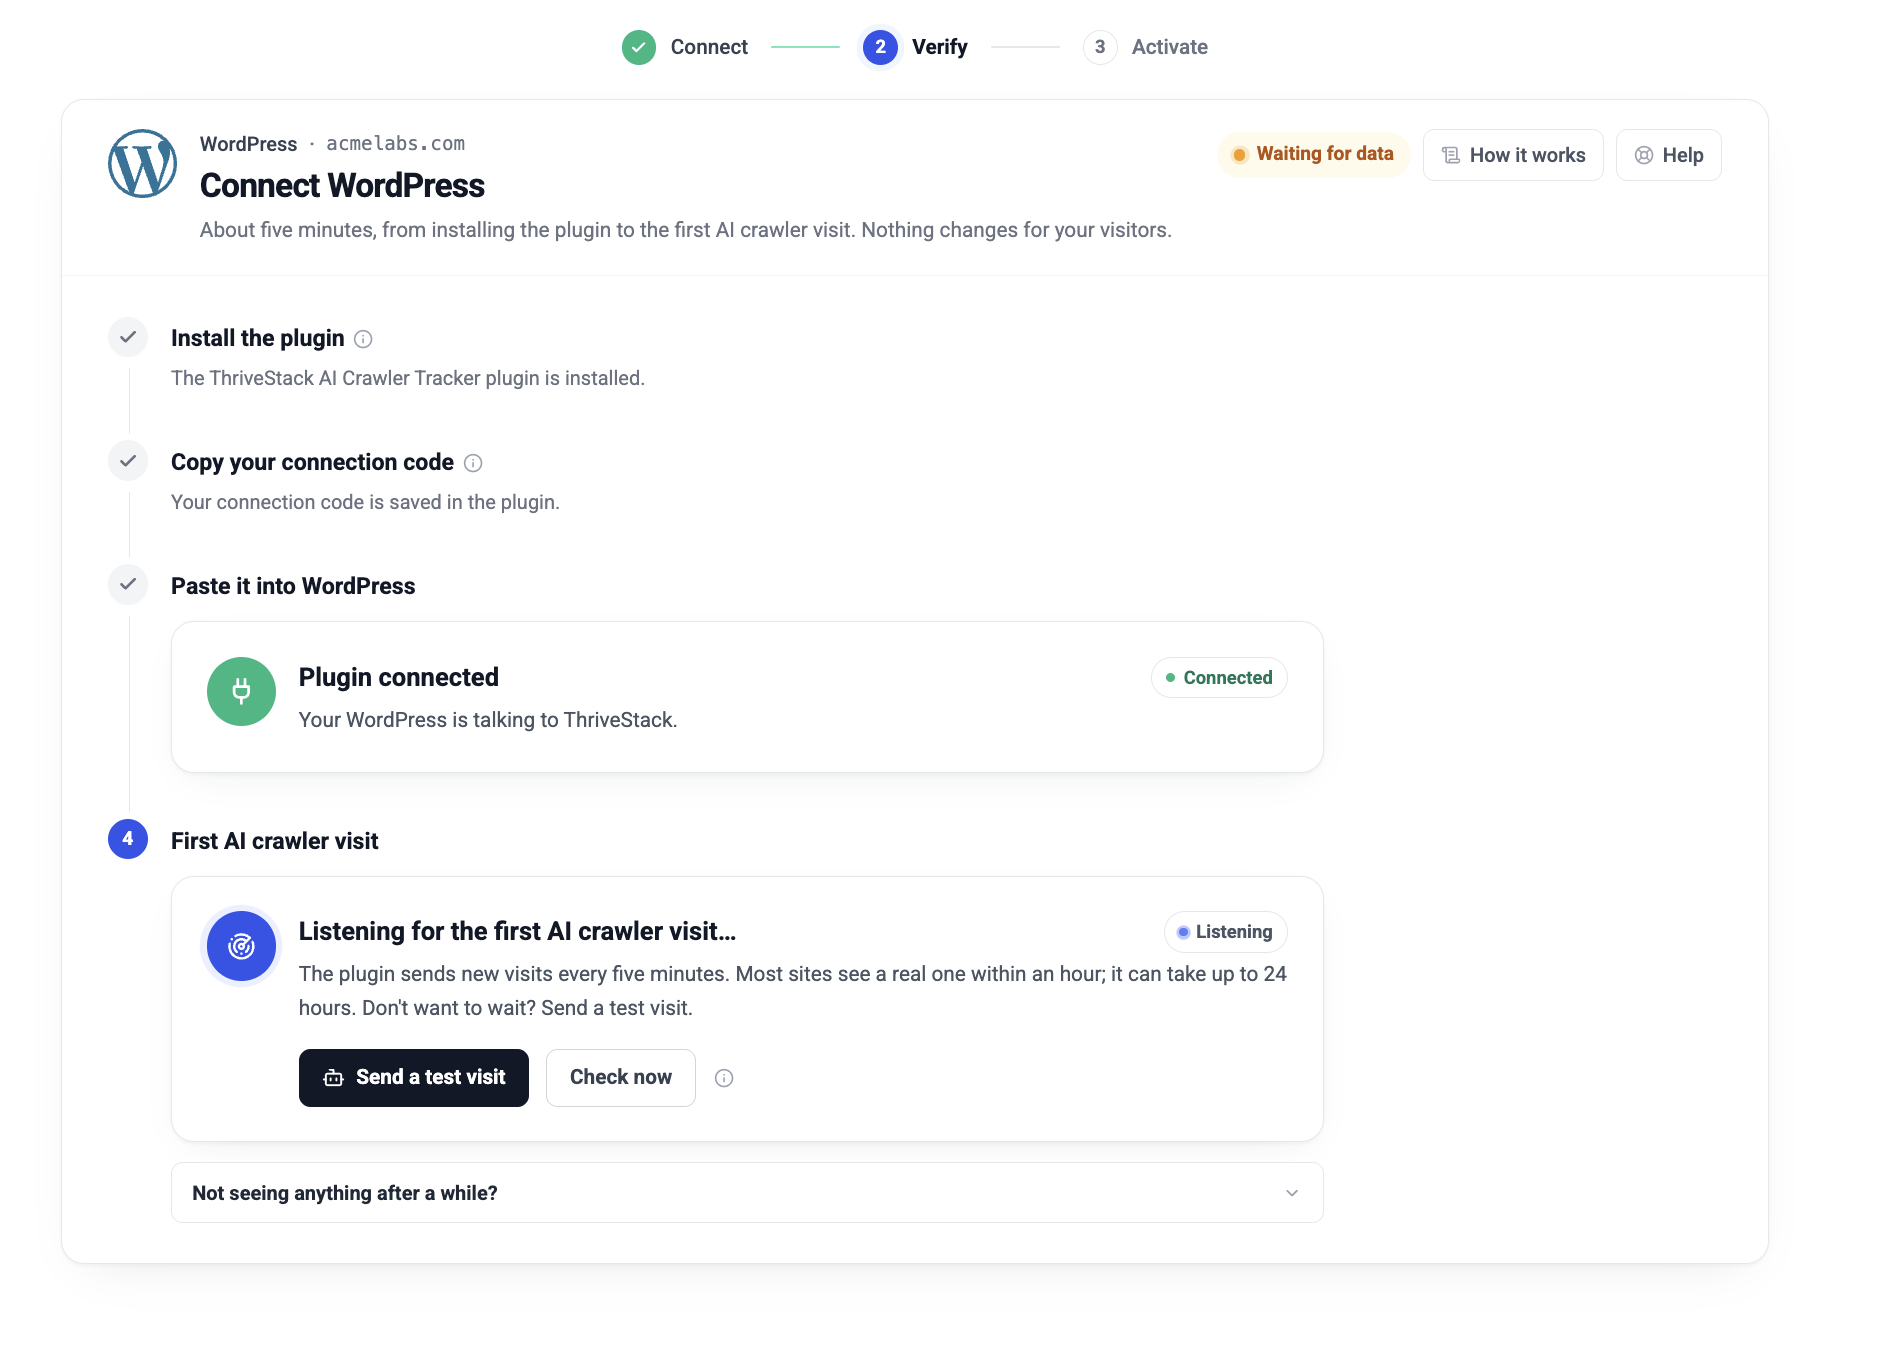
With the plugin connected, the last step shows Listening for the first AI crawler visit….
The plugin sends new visits every five minutes, so allow a few minutes after a visit. Most sites see the first one within an hour; it can take up to 24 hours, depending on how often AI crawlers visit. Check now re-reads the status on the spot.
Don't want to wait? Click Send a test visit. ThriveStack sends one real request to your site using the name of a known AI crawler (GPTBot). Then, in the plugin's settings, click Send now so you don't wait for the next five-minute run.
Plugin connected: now waiting for the first visit, or send a test visit.
The test visit goes to your tracked domain, so it only appears if that domain is served by the WordPress site where you installed the plugin. If it does not appear, see Troubleshooting.
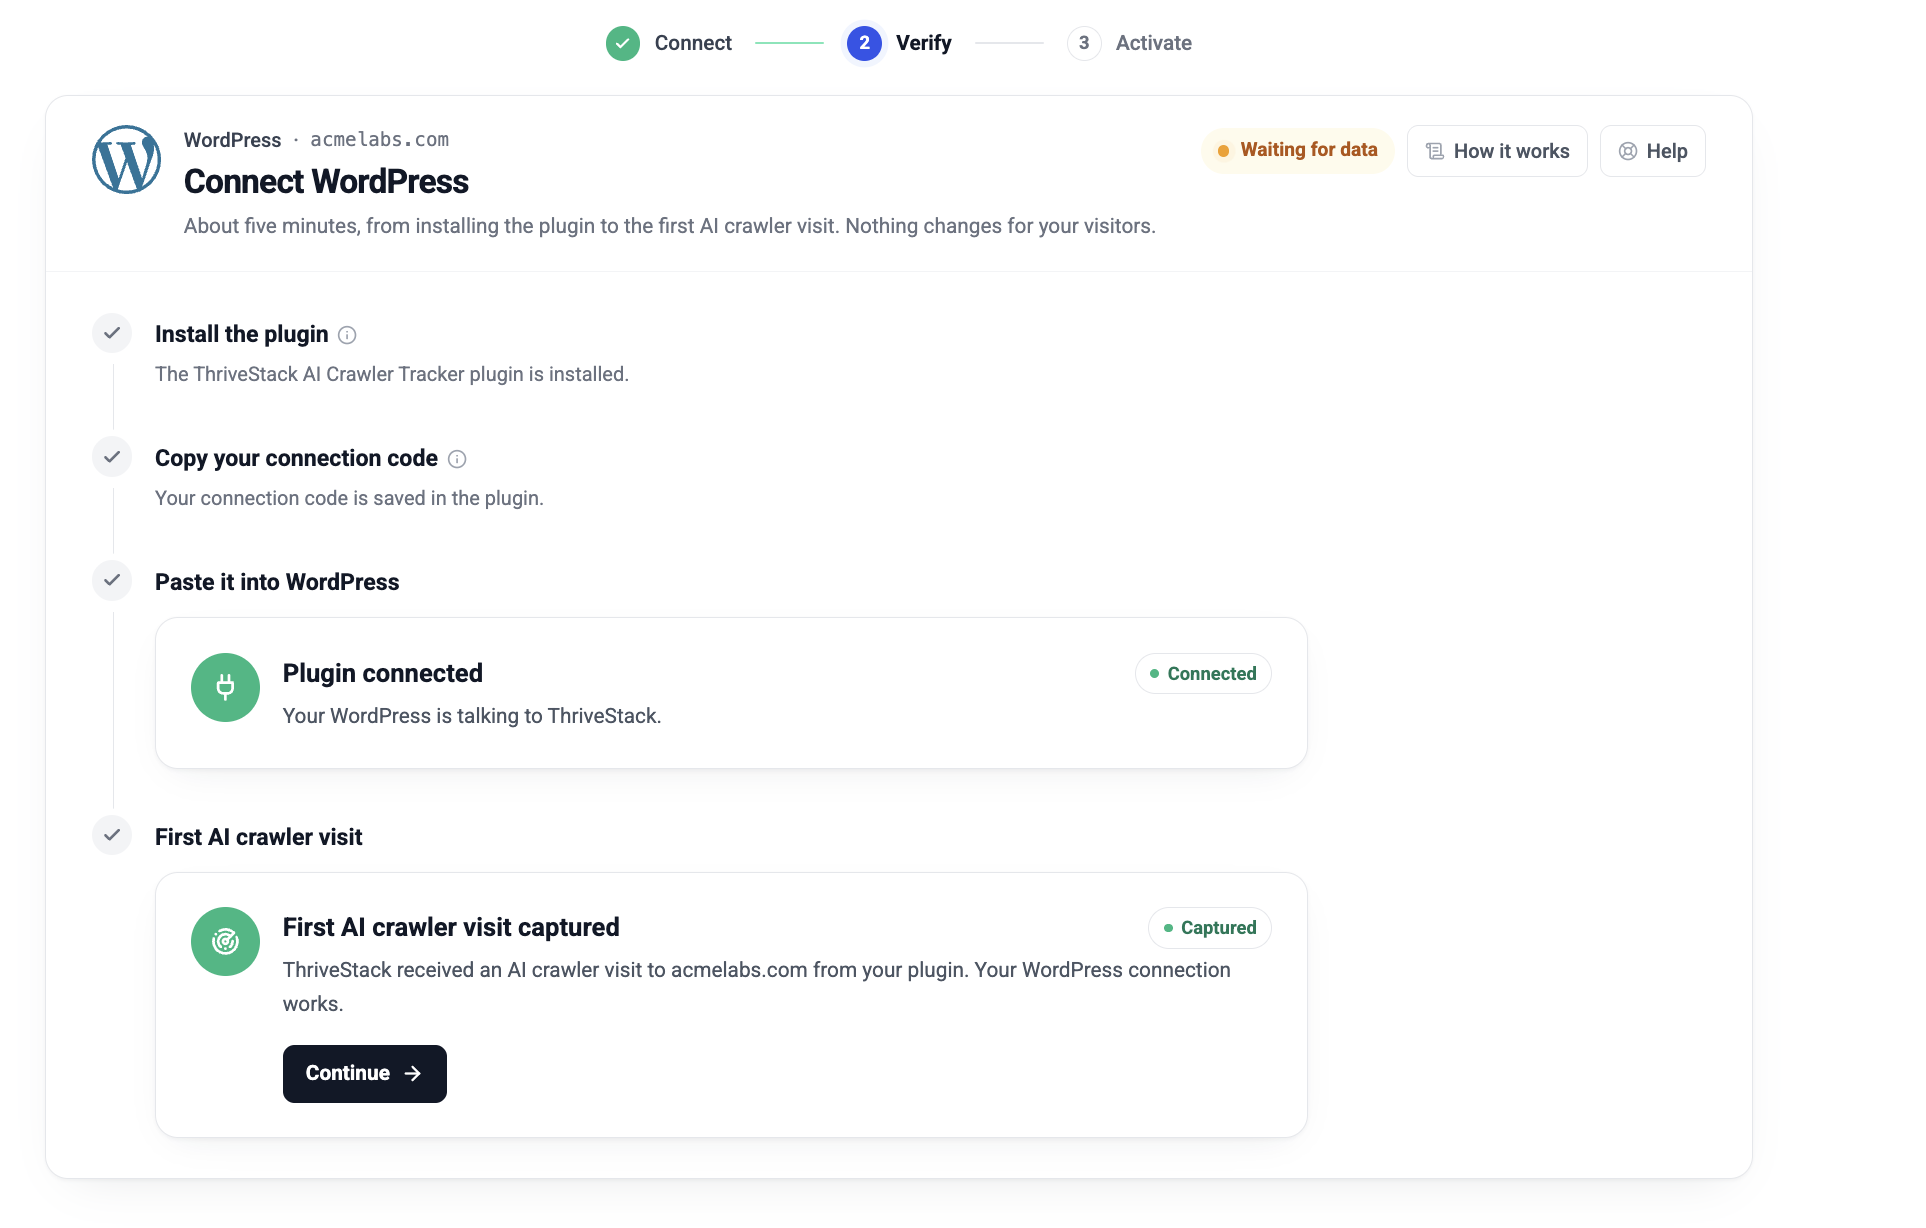
When a visit arrives, the step shows First AI crawler visit captured. Click Continue.
Your connection works. Continue when you are ready.
Turn on AI crawl logs
If the AI Crawl Logs add-on is not on yet, the last step activates it. The add-on unlocks the dashboards. (If it is already on, Continue takes you straight to the next step.)
During your free trial it costs nothing to activate, and the fee starts when the trial ends. Otherwise you pay on Stripe and come straight back.
Everything collected since you connected is kept, and appears the moment you activate. Pricing details
You are live
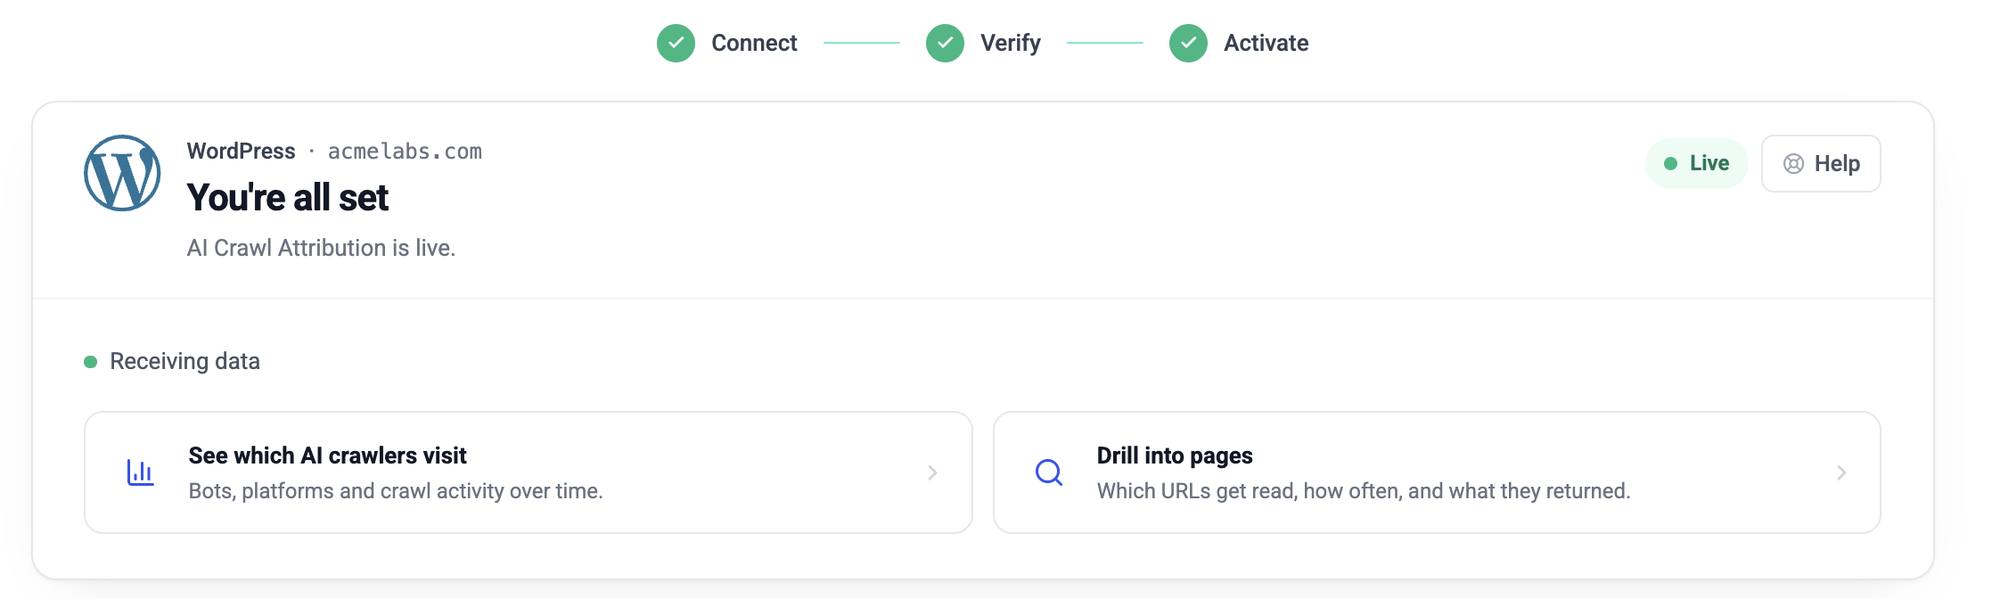
The card says You're all set, with when the last delivery arrived. Open See which AI crawlers visit or Drill into pages to start exploring.
Live: data is flowing.
Connect automatically
Where it is available, the WordPress card has a Connect automatically tab. ThriveStack signs in to your site with a WordPress Application Password, installs and activates the plugin, and saves the connection code in it for you. Your site must use HTTPS, on your tracked domain or its www version.
Create an Application Password
In WordPress, signed in as an administrator, open Users → Profile. Under Application Passwords, type a name such as ThriveStack and click Add New Application Password.
Copy the password WordPress shows (it looks like abcd efgh ijkl mnop qrst uvwx). It is not your login password, and you can revoke it at any time.
The same steps are under How do I create an Application Password?, below the password field in ThriveStack.
Sign in to your WordPress from ThriveStack
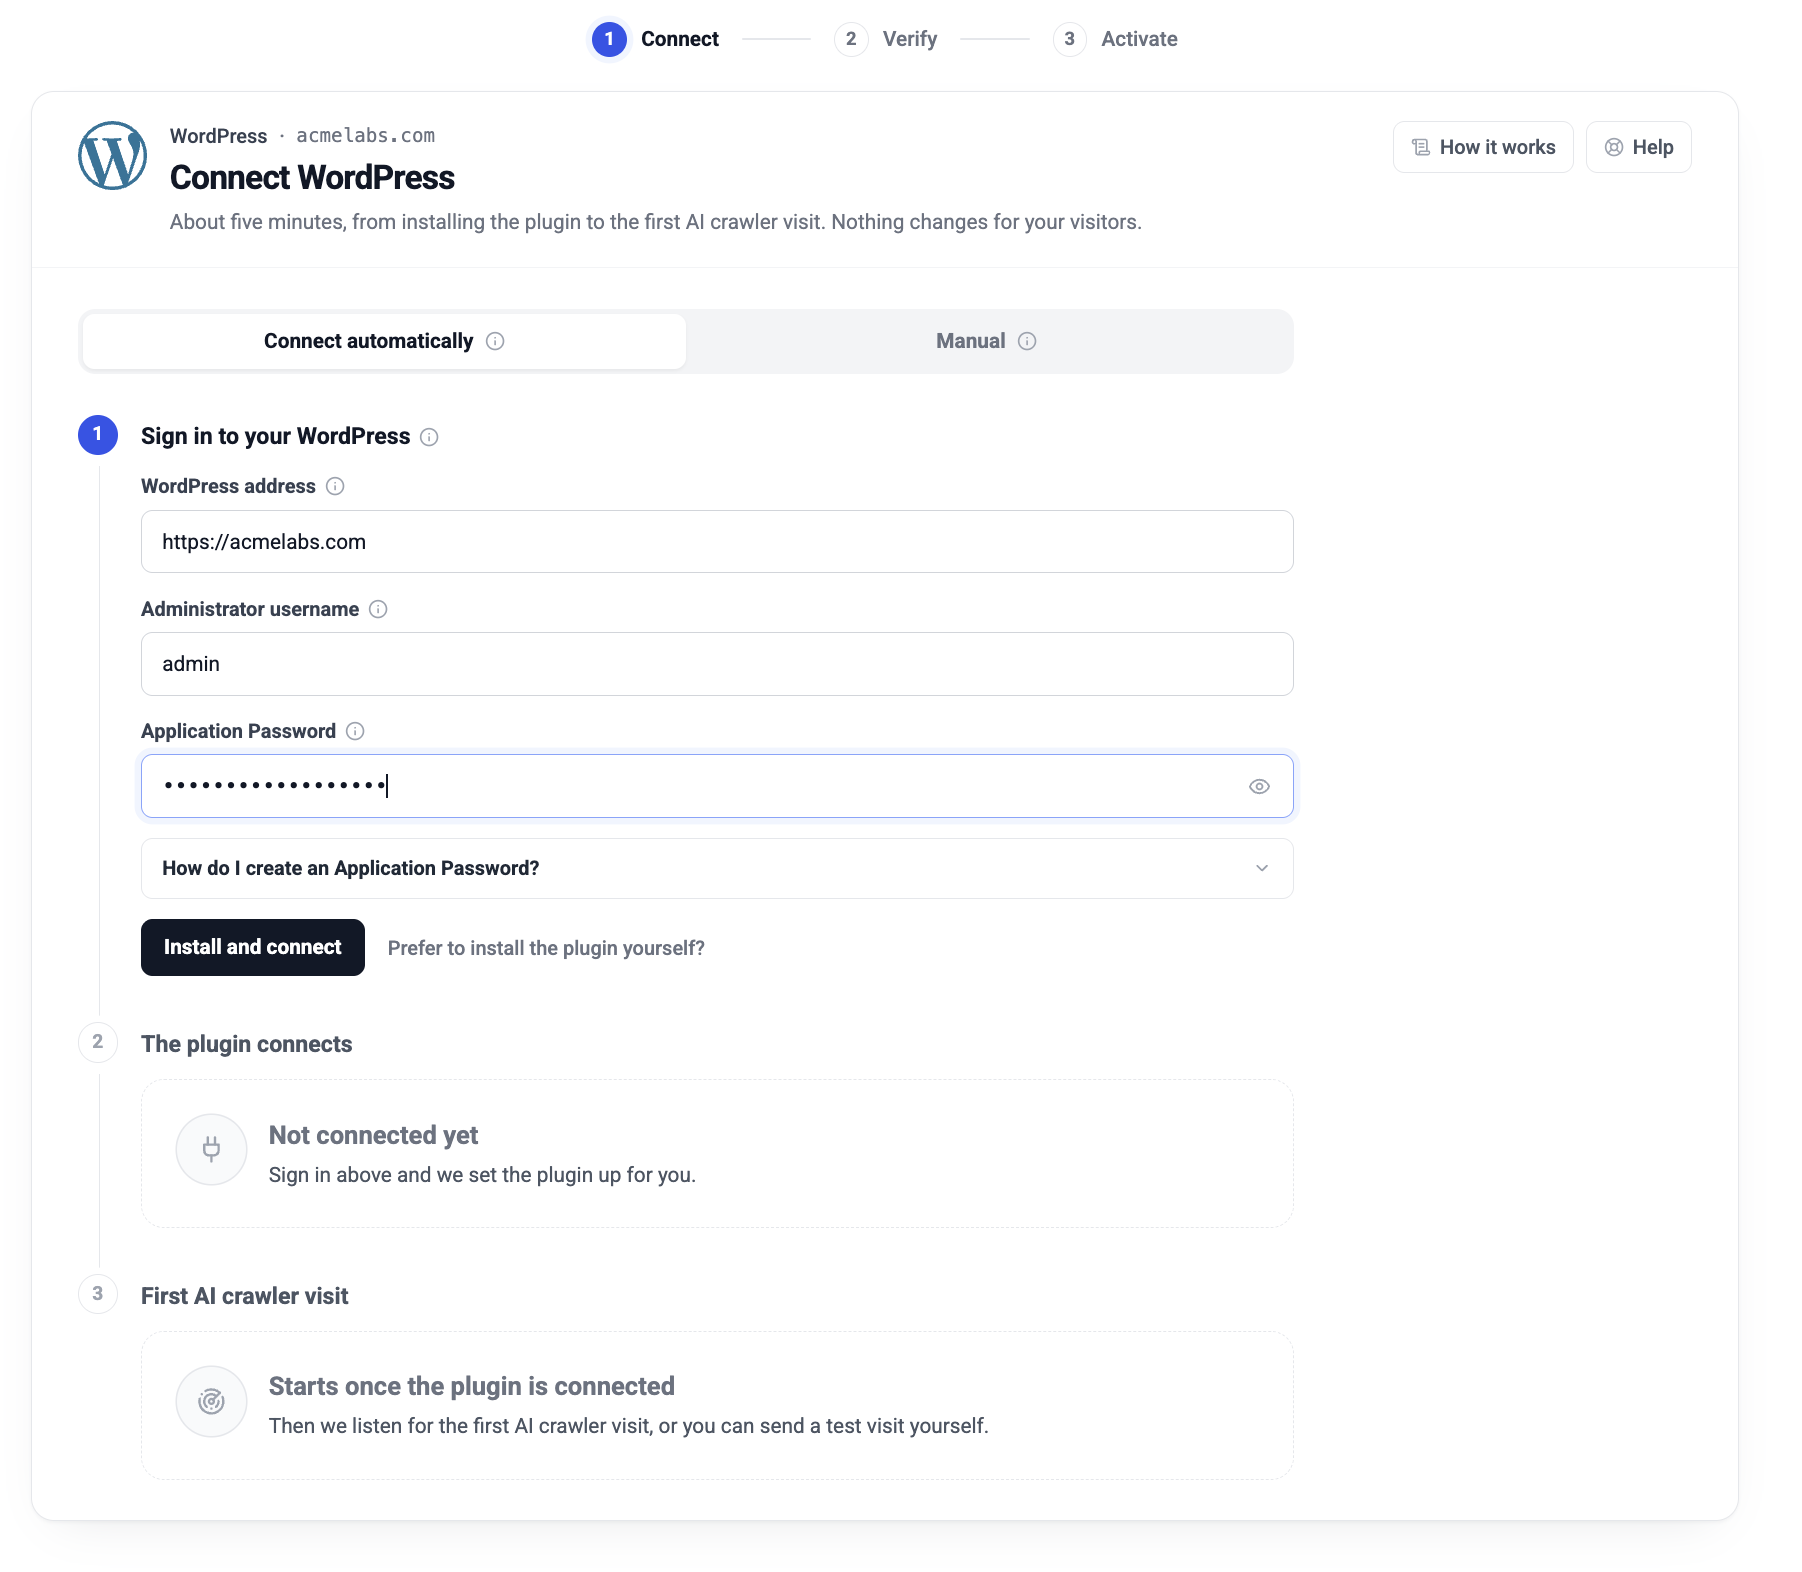
On the Connect automatically tab, check the WordPress address (filled in from your domain; add the folder if WordPress is installed in one, for example https://acmelabs.com/blog), then enter the administrator username and the Application Password.
Connect automatically: your WordPress address, an administrator and an Application Password.
Click Install and connect
ThriveStack checks that the account can manage plugins, installs the plugin (or activates it if it is already there), and saves the connection code. A message tells you what was done.
The plugin sends a test delivery straight away, so the next step usually shows Plugin connected within moments (or within five minutes, as it retries).
Then wait for the first AI crawler visit, as in step 6 above.
Your password is used once. ThriveStack uses the Application Password for this setup only and never stores it. It is sent only to your own site, over HTTPS. Once the plugin is set up you can revoke it in Users → Profile → Application Passwords; the plugin keeps working.
Prefer to install the plugin yourself, or your organization does not allow Application Passwords? Use the Manual tab and the steps in Connect from ThriveStack.
How the plugin finds your visits
The plugin has two modes. Its settings page (Settings → AI Crawler Tracker) shows which one is active under Source.
Mode
How it works
Cached pages
Server access log (preferred)
Every five minutes, the plugin reads the lines your web server added to its access log, keeps the AI crawler visits and sends them in one compressed, signed request. It finds the usual Apache, Nginx, LiteSpeed and cPanel log locations automatically.
Counted. The web server logs every request, including those your cache answered.
Fallback
Used when your host does not let WordPress read the access log. The plugin notes AI crawler visits as WordPress answers them and sends them every five minutes.
Not counted. A page served from a cache never reaches WordPress.
Your log is somewhere else? If you know where your access log is (your hosting control panel or host's support can tell you), enter its full path under Access log path in the plugin's settings and click Save. The log must use the standard combined format, which is the default for Apache, Nginx and LiteSpeed.
Quiet site? The five-minute schedule runs on WP-Cron, which runs when your site gets visits. On a site with very little traffic, or where WP-Cron is turned off, ask your host to set up a real cron job that calls wp-cron.php every five minutes. You can always click Send now in the plugin's settings.
What ThriveStack collects
The plugin picks out the visits whose user-agent names a known AI crawler on your site, before anything is sent. Visits from people never leave your WordPress.
ThriveStack checks every line again on arrival and keeps only AI crawler visits on your domain.
Kept for each AI crawler visit
Never stored
The page path (without the query string)
Your domain and the HTTP method
The HTTP status your site returned
The crawler's user-agent name
The referrer, if one was sent
The time of the visit
Visits from regular people (they are never sent)
Search engine crawlers (such as Googlebot and Bingbot) and SEO tools
IP addresses (a log line includes the crawler's IP address; ThriveStack does not keep it)
Cookies, form data and request bodies
Anything from your WordPress database: posts, users or settings
Nothing is sent until you save a connection code. The plugin also adds a suggested paragraph to your site's privacy policy page (Settings → Privacy) describing what it sends.
What access ThriveStack uses
Method
Access
Manual
None. ThriveStack never connects to your site; the plugin sends to ThriveStack, signed with your connection code.
Connect automatically
Your administrator's Application Password, once, to check the account can manage plugins, install and activate the plugin, and save the connection code. It is never stored.
Costs
The plugin is free. It has no paid version and no locked features.
ThriveStack: the AI Crawl Logs add-on. It is free to activate during your free trial, and the fee starts when the trial ends.
The add-on card shows the exact price before you pay. At the time of writing it is $10 per month and includes 100,000 AI bot events per month.
Extra events are billed in blocks of 100,000 on your next invoice.
There is no charge from WordPress, and the plugin does not depend on your hosting plan. Neither cost depends on the number of people who visit your site.
What you will see
Open Attribution → AI Crawl. The page has three tabs: Overview, Detailed Insights and Settings (billing for the AI crawl logs add-on). Connecting and disconnecting your site is done in Attribution → Setup.
Overview: who visits, and when
Total bot visits, how many different AI bots visited, your failure rate, and a chart of visits over time by crawler.
Detailed Insights: which pages
Every URL AI crawlers fetched, with visit counts, which platforms visited, the status your site returned, retrievals and citation rate. Filter by status code or folder, or export the table.
Pages that AI crawlers keep hitting but that return errors or redirects (4xx, 5xx, 301/302) are the quickest wins. A page that cannot be read cannot be cited.
Change or disconnect
Disconnect from ThriveStack
Go to Attribution → Setup and open WordPress.
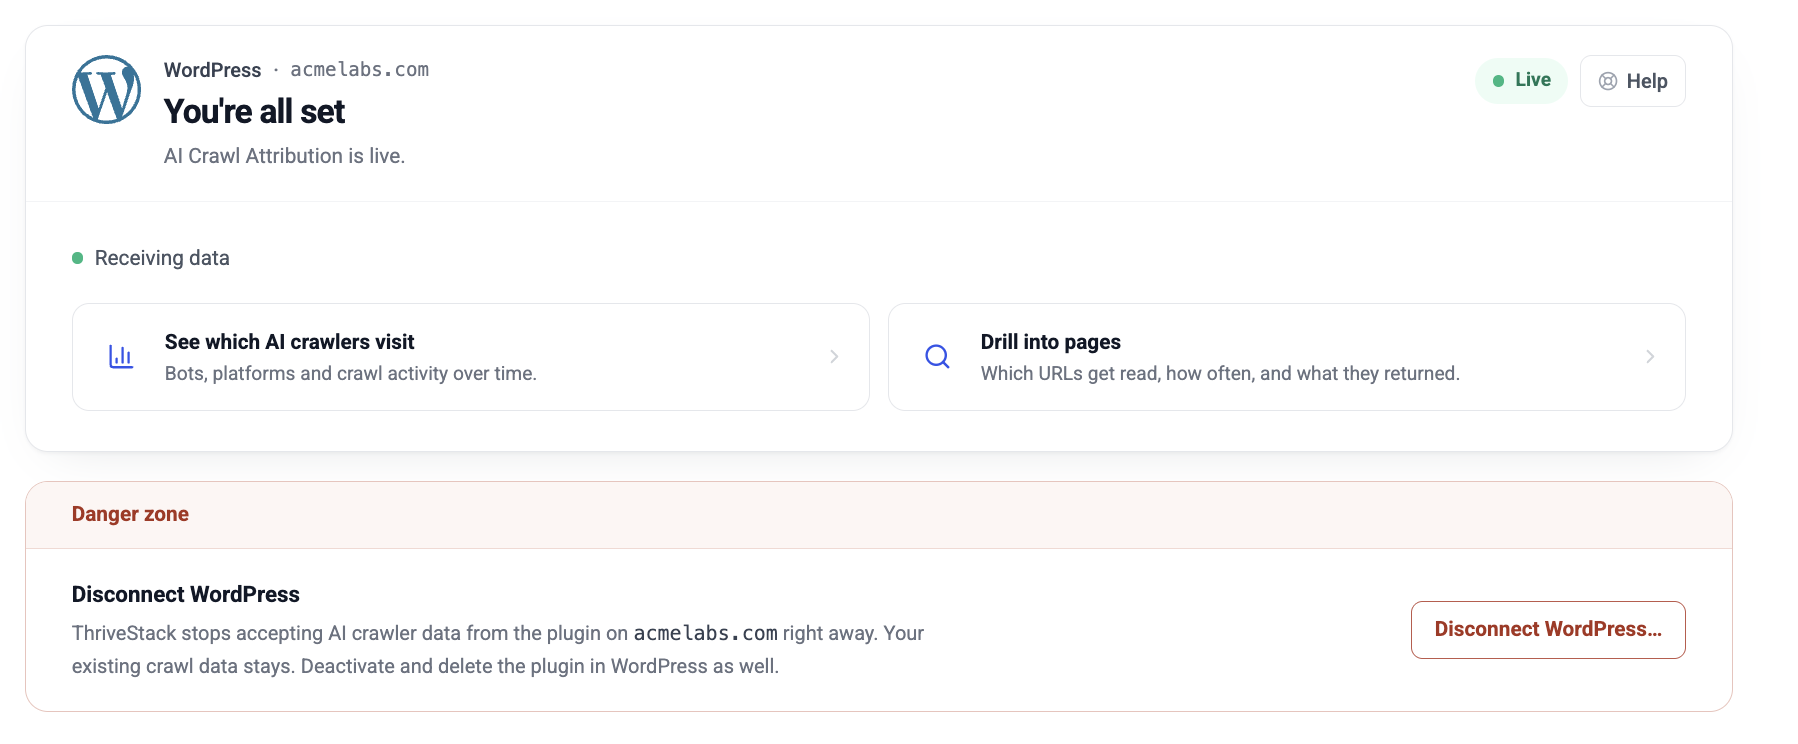
Scroll to the Danger zone at the bottom and click Disconnect WordPress….
Type your domain to confirm, then click Disconnect WordPress.
Disconnect: the Danger zone appears once your connection is verified.
ThriveStack stops accepting data from the plugin right away. Your existing crawl data stays in ThriveStack.
The Danger zone appears once your connection is verified (the first AI crawler visit arrived). While you are still setting up there is nothing to disconnect: to start over with a new code, use Get a new code instead.
Remove the plugin from WordPress
ThriveStack cannot remove the plugin from your site. In WordPress, go to Plugins, then Deactivate and DeleteThriveStack AI Crawler Tracker.
Deleting it also removes its settings. If you disconnected in ThriveStack but leave the plugin installed, it notices on its next run and stops sending.
Use a new connection code
Still setting up? If you lost the code before the plugin connected, open WordPress in Setup and click Get a new code in step 2, then paste the new code. The old one stops working.
Already connected, for example moving to a new site? Disconnect in ThriveStack, connect again to generate a new code, and paste it into the plugin's settings. The plugin's own Disconnect button only forgets the code on your site.
Troubleshooting
What you see
What it means and what to do
Stuck on Waiting for your plugin to connect…
The plugin has not contacted ThriveStack yet. In WordPress, open Settings → AI Crawler Tracker and click Test connection. It tells you exactly what is wrong if the code does not work. If the plugin reached ThriveStack with a problem, ThriveStack shows it under the waiting message.
Plugin connected, but Listening for the first AI crawler visit… never completes
Work through these in order:
Has the plugin sent anything yet? It sends every five minutes, and only when your site gets traffic. Click Send now in the plugin's settings.
Is it an AI crawler? Search engines such as Googlebot and Bingbot are deliberately not recorded.
Did the test visit reach this site?Send a test visit goes to your tracked domain. If that domain is not served by this WordPress site, the visit lands elsewhere.
Real crawlers can take hours, or up to a day, to arrive.
The plugin says Fallback: no readable access log found
Your host does not let WordPress read the server's access log. The plugin still works, but visits to cached pages are not counted. If you know where the log is, enter its path in the plugin's settings. If Cloudflare is in front of your site, the Cloudflare Worker source counts every visit.
This is not a ThriveStack connection code or The connection code is incomplete
The pasted text is not the whole code. Copy it again in full (it starts with tswp1.). If you no longer have it, click Get a new code in step 2 of the setup page.
ThriveStack rejected the signature or ThriveStack does not know this connection
The code in the plugin is not the current one, for example after you reconnected. Paste the latest code.
This site was disconnected in ThriveStack
The connection was removed in ThriveStack, so the plugin stopped sending. To reconnect, connect again in ThriveStack and paste the new code.
ThriveStack could not read the log lines
Your server writes its access log in a custom format. The plugin needs the standard combined format. Ask your host, or remove the custom log path so the plugin uses fallback mode.
Step 2 says You created a code on … instead of showing a code
A code was already created for this domain (for example earlier, or in another tab), and codes are shown only once. If you pasted it into the plugin, carry on with step 3. If you lost it, click Get a new code.
… is already connected for this domain through Cloudflare (or Vercel)
Only one server-log source can be active for a domain, so visits are never counted twice. Disconnect the other source first, or keep it.
WordPress didn't accept these details (Connect automatically)
Check the username and the Application Password. Some security plugins turn Application Passwords off; check their settings, or use the Manual tab.
This user can't manage plugins (Connect automatically)
Use an administrator account. On sites where installing plugins is turned off, install the plugin yourself and try again: ThriveStack then only activates and sets it up.
We couldn't reach your WordPress site (Connect automatically)
Check that the address loads in a browser over HTTPS, that it is your tracked domain or its www version, and that a firewall or security plugin is not blocking the WordPress REST API.
We couldn't install the plugin for you or Your plugin needs an update (Connect automatically)
Click Switch to manual setup, download the plugin and upload it in WordPress (an upload replaces an older version). Then use Connect automatically again, or finish with the manual steps.
Couldn't reach yourdomain.com after Send a test visit
ThriveStack could not fetch your site. Check that the domain loads in a browser, is not behind a login or a firewall rule that blocks bots, and redirects (for example to www) end on a page that loads.
The dashboards are locked or empty after verifying
The AI Crawl Logs add-on is not active yet. Click Continue after the first visit is captured, then finish the last step, Turn on AI crawl logs. Data collected since you connected is kept and appears as soon as you activate.
Still stuck? Contact support@thrivestack.ai or use Help in the connect panel. Include your domain, what the plugin's Status box shows, and, if you can, the time you connected.
Frequently asked questions
Will this slow down my site?
No. In server-log mode the plugin works in a background job every five minutes and is not involved in serving your pages. In fallback mode it does a little work only for AI crawler visits (it notes each one), never for visits from people, and sends them in the background.
Does it work with my cache plugin?
Yes. In server-log mode, visits that your cache plugin (such as WP Rocket, LiteSpeed Cache or WP Super Cache) or your host's cache answered are still in the server log, so they are counted. In fallback mode they are not.
Does ThriveStack see my visitors?
No. The plugin sends only visits whose user-agent names a known AI crawler. Visits from people never leave your site. See What ThriveStack collects.
Is my Application Password stored?
No. With Connect automatically, it is used once for the setup and never stored or logged. You can revoke it in WordPress afterwards. The manual method needs no password at all.
I use Cloudflare too. Which should I connect?
If Cloudflare proxies your domain, the Cloudflare Worker sees every visit, including those Cloudflare answers from its cache, so it is the more complete source. Only one server-log source can be active for a domain at a time.
How do I stop everything?
Disconnect in ThriveStack, then delete the plugin in WordPress. Data stops flowing immediately. See Change or disconnect.